Forage and Fizz part 3

It’s time for an update on the brew. After about a week in the demijohn the bubbling stopped, indicating it was time to measure the specific gravity. This showed a reading of 994 which was a good bit lower than the target of 1010. To remedy this we made a sugar syrup of 240 g of sugar in about 200 ml of water and added this to the demijohn (once the syrup had cooled down). We followed the guideline of adding 100 g of sugar per 5 litres to raise the SG by 7.5 points. When we remeasured the SG it showed a reading of 1015 which was probably fine given that the solution will ferment a bit more in the bottles. So we then siphoned the solution into sterilised plastic bottles, screwed the lids on and left them to ferment further to add some fizz. You could see that the yeast was settling out to leave a slightly hazy solution.

Whilst we were doing this we also started another brew up as there were still plenty of flowers on the bushes. We followed the same procedure as before except that we used a different champagne yeast which required rehydrating beforehand. We also measured the original specific gravity. This was 1075 which should give us a final alcohol content of 9.7%. When we came to transfer the must to the demijohn we siphoned it instead of filtering through a muslin bag which was quite a bit easier, however we did notice a few of the elderflower petals made it through into the demijohn. I’ll update next when we crack open the first bottle for a taste.

Forage and Fizz part 2

fermentation2_small

The next stage of the elderflower champagne is well under way. After leaving the primary fermentation in the bucket for 4 days, we strained it through a muslin filter bag into the demijohn. Again, everything that is touching the brew has been washed and sanitised. The demijohn was fitted with a bung and airlock containing a few millilitres of sodium metabisulfite solution. For the first hour there wasn’t much activity, but after that the bubbles started appearing in the airlock, and after 2-3 hours they were coming at a rate of one bubble per second. It’s been going steadily at this rate for the last 5 days now which is a good sign.

The solution is also very cloudy. It has definitely settled since we transferred it to the demijohn but the is still a lot of suspended material in the solution. I guess this should clear over time, particularly as the bubbling subsides. In a few days time we’ll probably do the first specific gravity measurement to see how the fermentation is getting on.

Forage and Fizz

We’re making some elderflower champagne this weekend. It’s our first attempt at some home brewing so hopefully it will be successful. The recipe we’re following is from the River Cottage ‘Booze’ book and looks straightforward enough. We’ve also had some expert homebrewing advice from Hop Hackers so we’re in good hands.

The first step was to wash our brewing bucket and spoon in VWP solution which is a bleach based cleaner. Then we rinsed everything with sodium metabisulfite to get rid of the bleach smell (and also as a mild steriliser). Finally we rinsed everything with a no-rinse sanitiser which is a mix of phosphoric acid and surfactant.

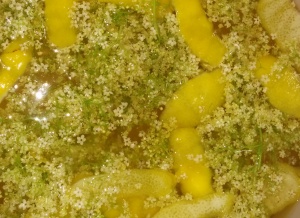
Elderflower_mustWith everything cleaned and ready to go the next step was to forage some elderflowers. The spring in the UK has been rather cool this year so the flowers are a bit late coming out but we managed to find around 15 medium to large flower sprays. We have an elder tree overhanging the end of our garden so we managed to get a reasonable crop from there and topped it up with a few more surreptitiously acquired flowers from down the road. We gave them a good shake to get rid of the aphids and a couple of caterpillars that were making their homes in there and added them to the bucket.

So in the bucket went the flowers with the larger bits of stalk cut off, pared zest and juice from 2 lemons, 900 g of sugar and 250 ml of grape concentrate. We added 2.5 L of boiling water to that, stirred it until the sugar dissolved and then topped it up to 5 L with bottled mineral water and finally added 1/2 tsp of yeast nutrient. The smell was amazing – very reminiscent of a Gewurtztraminer wine which bodes well!

We now need to leave it to cool before we add the yeast so I’ll update again later.

Update:

It took about 7 hours for the mixture to cool to room temperature at which point we aerated it (stirred it with a sanitised spoon), added the yeast and put the lid back on. Now all we need to do is wait for the magic to happen.

Ciabatta


Ciabatta loaf

Ciabatta loaf

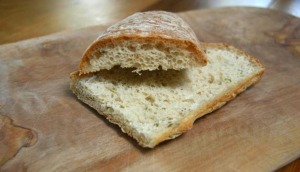
I made some ciabatta yesterday for the first time. Ciabatta dough is very soft, almost like batter, and this allows the characteristically big bubbles to form giving a lovely spongy texture. It also makes it really messy to make but it’s good fun. I used Paul Hollywood’s recipe which was as follows; 500 g of strong white flour, 400 ml of water, 30 ml of olive oil, 1 tsp of salt and 15 g of instant yeast. I also added a good handful of chopped fresh oregano and thyme. I mixed the dough for 8 minutes using a food mixer but you could use your hands if you wanted to. I left the dough to rise in a plastic tub, but I’d advise you to keep an eye on it as I went back to it after an hour to find it crawling over the edges of the tub and almost onto the worktop – a bit like the magic porridge pot! After turning the dough out onto a well floured board I cut it into four lengths and then transferred them (this is the tricky bit) to a couple of greased baking trays. After rising for a bit longer (30 mins) I baked them in the oven for about 25 mins at 220C. They didn’t rise a lot in the oven but the crust was a perfect golden brown and the bread inside had a fantastic springy texture with lots of big holes for trapping olive oil and balsamic vinegar – mmmm. The flavour was really good (quite yeasty) but I couldn’t really taste the herbs much so I either need to add more next time or perhaps add dried oregano as it has a stronger flavour. This bread is definitely worth a try but do be prepared to make a bit of a mess and to juggle the very soft dough onto the baking trays.

The Sponge continued

So this is what the sponge looks like after being left to ferment overnight.

A wholemeal sponge after fermenting overnight

I added the remaining flour to this (another 175 g of strong white flour and 175 g of strong wholemeal flour), 1 tbsp of olive oil and 2 tsp of salt and worked it into a dough.  After kneading for 5-10 minutes I formed it into a round and left it to rise in a warm china bowl covered with a plastic bag. It had doubled in size after about 45 mins so I turned it out onto the work surface, deflated it by prodding it gently all over, reshaped it and left to rise again in the bowl. After about half an hour it was more or less doubled in size again so I cut the dough in half and made one small loaf and four rolls. You then need to leave these for the final rise (often called the prove) for about 20 minutes while the oven warms up to 230 C. Just before they go in the oven slash the tops with a bread knife and pour some boiling water into a tray in the oven – this creates lots of steam which helps the loaf to rise before the crust hardens. The loaves then went in for 10 minutes at 230 C and then I dropped the temperature to 180 C for a further 6 minutes (for the rolls) and 20 minutes for the loaf. The finished articles are now gracing the header at the top of the page.